How to Clean a Pet’s Ears
Ear infections are common in pets, and an important way to help eliminate these infections is to clean the ears. It is important to treat the ear canal correctly, ensuring the solution reaches the target location. With practice, instilling solutions into the ear canal is easy and can be done at home as needed.
GETTING STARTED
Equipment/materials needed:
• Gloves
• Cotton balls or gauze
• Ear-cleaning solution
Your veterinarian may have prescribed a solution to place in your pet’s ear. You should wear latex (or similar) medical exam gloves to prevent you from coming in contact with potential bacteria or fungi your pet may harbor. Basic hygiene is important, and you should be sure to wash your hands immediately after each ear-cleaning session.
Choose a location where expulsion of contents from the ear canal, which is going to happen at the end of the procedure with headshaking, won’t cause a messy problem (i.e., don’t do this with your pet beside something that is valuable and difficult to clean).
TROUBLESHOOTING BEFOREHAND
Ear-cleaning solutions are generally applied to maintain your pet’s ear canals and prevent infection. However, if you notice any of the following symptoms, you should contact your veterinarian immediately:
• Increased fluid or pasty discharge from one or both ears
• Increased redness, swelling, or heat from the ear
• Increased pain
• Increased shaking or scratching of the ears
• Inability to instill the solution (for example, if your pet will not allow it or because you feel you are not doing it correctly)
If your pet shows resentment to having this done, stop the procedure and call your veterinarian for further advice. The ear may be too painful to treat without additional medications, and it is imperative that you not hurt your pet or put yourself at risk of a nip or bite. This may also be an indication that the condition is worsening and should be checked immediately.
Keep in mind that some individuals are more prone to ear disease than others. This can be due to ear shape (floppy-eared dogs are especially susceptible), environment and activity (swimming allows water in the ears and favors infection), and likely genetic predisposition as well. Therefore, ear cleaning should be done when your individual dog or cat needs it, which is different from one individual to the next. Be sure to ask your veterinarian about the best interval between ear cleanings to avoid over- or underdoing it. Excessive ear cleaning must be avoided because it causes inflammation in the ear canal, which is totally counterproductive.
Never use Q-Tips or other cotton-tipped swabs to clean your pet’s ears. Too often, this results in pushing the debris back into the ear canal, which is the opposite of the intended effect. Cotton balls or gauze squares work well to remove debris from the ear flap and upper ear canal.
A really helpful preparatory step is to put the bottle of ear-cleaning solution under your own armpit for 10 or 15 minutes before the ear cleaning. This brings the solution to body temperature and makes it much more comfortable and pleasant for your pet.


PROCEDURE
1- In calm pets, ear cleaning can be done with just one person, but with young, excited animals, or pets that dislike (or are unfamiliar with) ear cleaning, it may be necessary to have one person distracting and/or holding the pet while another person instills the solution. The whole process should take about 5 minutes. If it is too complicated or difficult, notify your veterinarian to discuss whether there are alternative strategies.
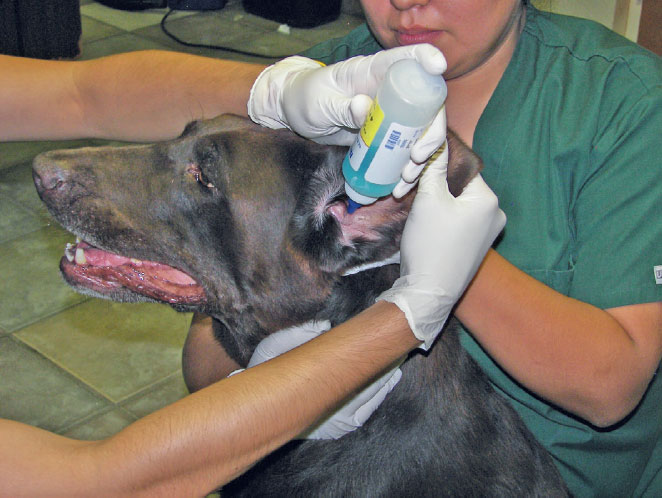
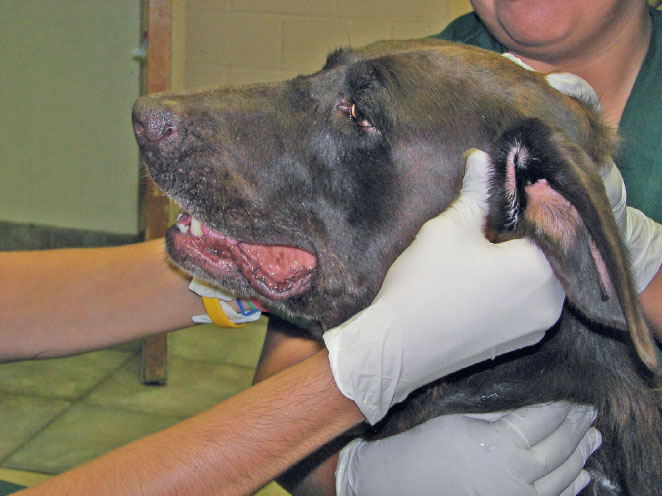
2- With one hand, gently flip the ear flap straight up. This is best done by cupping the ear flap (pinna) in your hand, with the haired part of the ear against the palm of your hand and your thumb on the hairless inner surface of the ear flap (see right hand in first photo, below). You should be able to see the inside of the ear (ear canal) this way. Some breeds of dogs have naturally upright ears, and in these dogs, the hand can simply be cupped behind the ear.
3- Holding the ear flap cupped in the palm of your hand means that the ear canal takes on the shape of a funnel. You can then place the lukewarm cleansing solution into the ear canal, allowing the solution to fill the canal to the brim. This means a gentle stream of the solution will need to go in for several seconds, not just a few drops. In a medium-size dog, 1 tablespoon (15 mL) typically will be necessary; a half to 1 teaspoon (2.5 to 5 mL) is expected for cats. Do not allow the bottle tip to touch the ear canal, which would contaminate the bottle and its contents.
4- Then lower the ear flap and massage the ear canal for 1 minute. Do this by using your thumb and forefinger to gently compress and roll the tube-shaped ear canal. You can feel it through the skin and hair at the base of the ear, directed inward and slightly toward the dog or cat’s hind end.
5- Having placed the cleaning solution in the ear and done the ear massaging, now allow your pet to shake his or her head. This will loosen debris in the ear canal and propel it outward. Then use a cotton ball to clean the ear flap and upper ear canal.
AFTERWARDS
Once you have finished cleaning the ears, discard any remaining used gauze and gloves. Replace the cap on the cleaning solution, and place it in a safe area out of reach of children and pets.
Try Peace of mind with our affordable pet Wellness Plans


Recent Comments